Quick steps
- Check the record identity and current permission to use the file.
- Choose Evidence for activity evidence or Documents for supporting paperwork.
- Choose Add evidence or Upload document in the appropriate section.
- Select the file and complete the type, Caption or title, and other requested fields.
- Check any confidentiality setting and expiry or checking date before uploading.
- Wait for the result, then reopen the record and verify the uploaded item.
If it goes wrong
Read the message before trying again. Reopen the correct record and check what was saved. Ask your manager if access or responsibility is unclear.
Choose the destination before selecting a file
Use Evidence for material that supports the work, such as an approved activity photo or piece of work. Use Documents for supporting paperwork.
Supporting document types include assessments, correspondence, certificates, medical information and consent forms. Choose the type that helps the next reader find it.
A document upload does not complete every related workflow. For example, saving a consent form does not by itself record a consent decision.
Check the original
- Confirm that the file belongs to the selected record and contains the intended version.
- Open it locally first if its contents or orientation are uncertain.
- Check every page for unrelated records, hidden comments or information about other people.
- Confirm that you have permission to store and use the material for this purpose.
- Use your organisation’s approved storage and transfer arrangements.
Add activity evidence
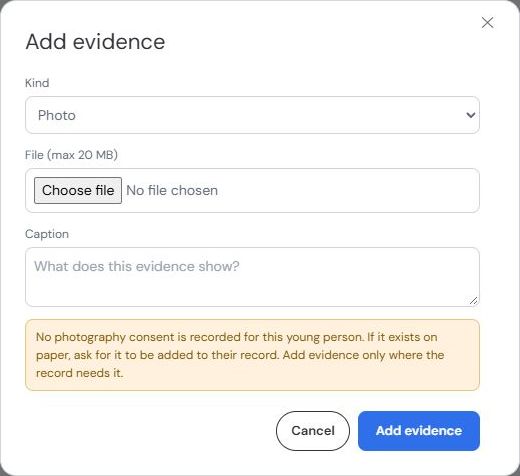
Open Add evidence, choose the kind, select the file and write a useful Caption. The evidence upload shows a 20 MB maximum.
The picker accepts common document, image, audio and video formats. Use a format offered by the current picker; renaming an extension does not convert the file.
Explain the activity or observation the evidence supports. Avoid captions that only repeat a filename. Keep opinion separate from what the evidence actually demonstrates.
Check current photography consent before uploading or using images. An explicit refusal can hide photo evidence. Ask for guidance if the permission or intended use is unclear.
Add supporting paperwork
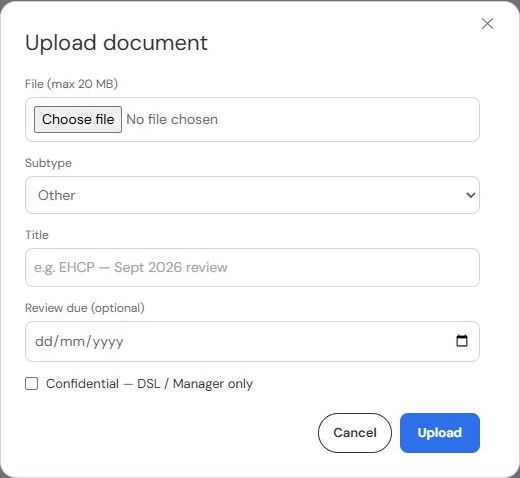
Open Upload document. Select the file and its type, then add a title that distinguishes it from older or similarly named documents.
If a checking date is offered, use the date the document needs attention. If confidentiality is offered, consider the content and your organisation’s access rules before saving.
A sensitive document should reach only the colleagues who need it. Ask your manager or DSL when the correct handling is unclear.
Confirm success
Wait for the upload response. Reopen the appropriate section and locate the new item. Check the title, category and record identity.
Open the item using the available view or download control. Check that its contents are readable and match the file you intended.
If you cannot see an item, consider access restrictions and consent before uploading it again. A hidden item is not necessarily a failed upload.
Handle errors without creating duplicates
A lost response can leave an upload uncertain. Follow the instruction to reload and check the original record before retrying.
If the selected record changes during an upload, check the original record first. Do not assume the file moved with your navigation.
If the format or size is rejected, use an approved export or compression method. Keep an appropriate original and avoid public conversion services for confidential records.
If a file was attached to the wrong record, stop sharing it and contact an authorised colleague promptly. Follow the correction process rather than creating more copies.